Duration 4:19
Integrating our Auto-Tracking Camera with Kaltura, Panopto & More
Published 3 Mar 2021
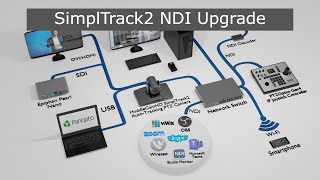
In this video, we are going to set up an Epiphan Pearl Nano with a HuddleCamHD SimplTrack2 camera to show it can be used as a lecture capture solution. The Epiphan Pearl is the ideal lecture capture recording device that can be easily integrated into popular learning management systems such as Panopto and Kaltura. The HuddleCamHD SimplTrack2 is an auto-tracking camera that can automatically follow a presenter from up to 55’ away when installed in a classroom. By using the Pearl Nano with the SimplTrack2 we can schedule lecture recordings directly through Panopto or Kaltura while also recording and streaming with the Pearl Nano whenever a lecture is being given. We will also use the Pearl nano to create a few different layouts to show presentations and camera video together. To get started, we will plug in the Epiphan Pearl Nano to power. For today’s demo we will use the ethernet port, allowing us to power the Epiphan Pearl Nano over PoE (using our PoE+ networking equipment). Next, we will make sure our SimplTrack2 camera is set up and ready to track the lecturer. To do this we already have our SimplTrack2 camera on and connected to the network. Using the HuddleCamHD SimplTrack2 software we can check in on the auto-tracking camera parameters to ensure reliable subject tracking for our video recordings. Once we have confirmed the tracking areas, and fine-tuned the cameras auto-operation parameters everything should be set for 24/4 camera operations. Next, we will plug in our video sources to the Epiphan Pearl. Let’s start with the HDMI port to connect our presentation laptop. Next, we can connect the SDI port to the SimplTrack2’s video output connection. Because we also have an LCD monitor to show our presentation in the room, we will also connect the HDMI loop through port from the Epiphan Pearl Nano into the display. This allows the Pearl Nano to capture the HDMI for recording and streaming, while also allowing us to display the video on a local monitor. From here, we can configure the Pearl using the IP address found on the Nano display. We can type this IP address into a web-browser to start laying out our recordings. Let’s start by checking our HDMI input. Yup, it’s working and it’s set to 1920x1080. That’s fine for this video recording. Let’s label it “Presentation PC” and move on to our SDI input. Next let’s label our SDI input “SimplTrack2”. Let’s check to make sure it’s set to 1920x1080 as well. From here, let’s configure a channel to show the auto-tracking camera next to the HDMI presentation feed. You can click Channel the open up the layout area. Here we can crop the video feed and optimize the layout, even adding a picture. You can set up this channel with a variety of layouts to make sure you are always capturing the most important content for your recorded lecturers. Once connected to the Pearl Nano the HuddleCamHD SimplTrack2 does not require a camera operator to follow presenters. Similarly the Epiphan Pearl Nano can easily be used with learn management software to automatically schedule recordings through the learning management system you are already using. Together we believe these solutions will create affordable and easily manageable lecture capture solutions for many organizations. This has been a quick video showing how easy it is to set up the Pearl Nano with the SimplTrack2. By combining the hands-off auto-tracking capabilities of the SimplTrack2 with the powerful LMS integrations of the Pearl, we believe this is a lecture capture solution many organizations will enjoy. Until next time, don’t forget to subscribe. ✓ Watch our Latest Friday Live Stream: /playlist/PLvb8dQmTpNldSvYZkTqLOJUgUvVaR1yRl ✓ Subscribe to our Channel - /channel/UC-G6mUqtbHR6OEOPdhilsfw ✓ Download our 3D Models and/or request a 3D Technology Layout - http://huddlecamhd.com/landing/HC-3D.html Hashtags: #panopto #Kaltura #Epiphan
Category
Show more


Comments - 0
Related videos for Integrating our Auto-Tracking Camera with Kaltura, Panopto & More: